'13 A&S Clutch retrofit?

Yamaha FJR Motorcycle Forum

Help Support Yamaha FJR Motorcycle Forum:

This site may earn a commission from merchant affiliate links, including eBay, Amazon, and others.
Glad to hear Viper! It's definitely on my list of things id like to do when i win the lottery. :p

 
Hi guys
i'am considering to upgrade to this clutch

IS IT SUITABLE FOR MY Gen2 2006 ? i think is a right time as i might have some used discs and the clutch is slipping

i saw Twoweelobsession.com video and everything went smooth !
See my post #63 regarding 2006,2007 and 2008 GEN II's. A few additional parts are required. Note that I myself have not done the upgrade, this was just my analysis based on parts fiche differences.
Lazy Linky
smile.png


Last edited by a moderator:
Still waiting for my last part from Pro Caliber. They said they thought they shipped it with some others but they didn't. Not sure I would use them again.

Since I have so much time on my hands I watched the Two Wheel Obsession video of his upgrade and have a few comments to add:

1) You don't need to drain the oil unless you really want to. The oil level is much lower than the clutch housing. Especially if you put the bike on its side stand, which would also make it easier to work on the right side of the engine. Might also keep that pesky push-rod ball bearing down inside the hollow shaft better.

2) When removing the nut from the clutch hub, put the bike in 5th gear and press on the rear brake pedal. The bike won't move at all while your are loosening or tightening the nut.

3) The parts list for the upgrade calls for replacing the bearing in the pressure plate (item #9), but it is the same part number bearing as the old one. I did not order that bearing but may go ahead and do that so I don't have to press out the old one. Depends on when my last part arrives. I do have a small press so getting the old one out should be trivial.

4) The part number for item #21 - "Spacer 1" has a new part number. I don't know how important the difference in that part is, but I did order the new one and will be installing it. I'll compare the parts and report back here if it seems important or not.

5) After reassembling the clutch assembly, you do not have to put the clutch cover back on before testing the action of the clutch. I plan on testing the action while I can still watch it move and only if everything looks right, put the clutch cover back on.

That's all for now...

 
Last edited by a moderator:
A few things I might add to Fred's comments:

I used a small air wrench to remove that 30mm nut on the clutch hub. It worked as planned.

I did install a new bearing but since I don't have a press I heated the hub to approx 500 degrees in the oven and chilled the bearing in the freezer to zero. Made inserting the bearing a little bit easier.

That little ball bearing was just on the end of the short push rod. So when carefully removing the push rod put your hand under it to catch the ball bearing if it should fall out. Mine stayed in the hole and I used a small magnet to grab it.

I did not replace Item #21. In fact I did not even remove it!

When completing reassembly just before installing item #8 with the springs inserted, make sure those final end clutch and friction plates are securely installed . Then go ahead and install the spring bolts and torque to the right value. No big deal since they are small bolts I just snugged them up.

So far I've got about 5,000 miles on the new clutch assy and it works great!

 
Fred, BTW, I got all my parts from Babbitts on line. Took about 3 weeks to receive all parts in incremental deliveries.

 
Yeah, I ordered my 'Strom parts recently from Babbits and got great service. Sometimes it's worth paying a bit more, but you never know when "sometime" is.

I have an electric impact gun I may try on the nut, but when I did my 'Zooki clutch recently I just used the rear brake to hold the hub. And that has a chain, so bound to be sloppier.

Did a google search on the bearing and found a yamahe 'fishul part on eBay for less than $10 shipped, so ordered it up. It will probably beat my last spring plate seat (<$2 part) from Pro Caliber.

 
I would have expected that middle gear damper spring gizmo to come into play a bit when using 5th gear and the rear brake during the loosening and tightening of the axle nut.

That gizmo must have a very strong spring. One wonders how much torque is required to get any movement from that mechanism.

 
I not only want the lighter lever effort, but I also want the improved clutch grip of the assist, and the slipper function on fast and aggressive downshifts. The slipper function won't mean diddly when tooling around on city streets, but when you are out flexing the sport side of the bike it should be quite a nice feature. As for $300 being too much dosh, it's a whole lot less than how much more a 2016 would be. Just sayin'
Fred, I use my FJR as a sport bike here in California. I'm very interested in your review of how/if the slipper function works. The FJR has a heavy engine with a lot of engine breaking and a slipper clutch for $300 bucks is a steal. I'm skeptical whether this conversion actually creates a slipper clutch and would expect there are other drivetrain components involved.

- Keith

 
I'm skeptical whether this conversion actually creates a slipper clutch and would expect there are other drivetrain components involved.
- Keith

Why? What components? Seems pretty straight forward to me. Did you watch the video Fred linked to?

And then there are those who already said it works.........

And then there is the 'using proper technique' negates a lot of the need for a slipper clutch?

 
Last edited by a moderator:
Skooter is just being grouchy.

Having the parts in my hand, I see how the slipper and assist functions work. You can see how sloped ramps on the clutch hub and pressure plate engage each other and how that will tension the plates more under acceleration, and likewise how they will release pressure on the friction plates under deceleration.

edit - It may be worth saying that a slipper clutch is not the same thing as an auto clutch, like a Recluse. It is not a centrifugal type design and will not uncouple drive power when you let off the gas; like one of those.

The only real question in my mind is how hard to you have to decelerate to have it release the clutch, but I am guess it is proportional and gradual. I'll also be measuring exactly how much lighter the clutch pull is with the three small springs vs. the stock one. That is if Pro Caliber ever sends me the last part.
rolleyes.gif
(I'll do a full report in the vendor section on them)

 
Last edited by a moderator:
I'm patiently waiting for Fred to be the first in the neighborhood to do the clutch swap so I can leach off his experience get advice from him about the process. I almost never had problems with my '04 but the '15ES has several times had the back end loose traction and step out upon throttle braking. Part of the problem is my commute, part of the problem *may* be the OEM tires. I had a slipper clutch on my Honda and liked the feature and would do it again for my FJR. A lighter clutch pull would be side bonus.

It looks like I will need to order the parts now so they will be here in time for a winter project ;)

 
Yes to the OEM tire being implicated in loss of traction. Same was true of the BT023GT I tried on the '05.

Get a PR-x (where x = 2,3, or 4) on there and you'll be much happier.

Should be no problem getting the clutch parts, just order them from another source. ;)

 
I would have expected that middle gear damper spring gizmo to come into play a bit when using 5th gear and the rear brake during the loosening and tightening of the axle nut.
That gizmo must have a very strong spring. One wonders how much torque is required to get any movement from that mechanism.
Yes, it has to be stiff, and it is limited in how much motion you'll get.

Here's the Middle Gear drive shaft assembly (below).

Middle%20Gear%20Drive%20Shaft.jpg


#5 is the drive cam and #4 is the driven cam. When you are loosening the clutch center nut you'll be turning the clutch hub in the "normal" drive direction (as Kaleria mentioned the bike wants to walk forward) You would be trying to force the spring loaded driven cam to climb the sloped face of the drive cam. The spring must be very stiff since the engine's full torque is what these parts are normally exposed to during operation. The clutch hub nut is only torqued to 65 ft lb.


"The part number for item #21 - "Spacer 1" has a new part number. I don't know how important the difference in that part is, but I did order the new one and will be installing it. I'll compare the parts and report back here if it seems important or not."

They may have added some additional oil ports to supply more oil to the clutch boss. Oil flows from the axle through the spacer to the clutch housing bearing. There must be at least two holes in it, maybe they added some more.

 
My last part finally arrived yesterday morning. My mind was too distracted (from other things) for doing any office work, so I decided to install the clutch upgrade into my FJR yesterday afternoon instead.

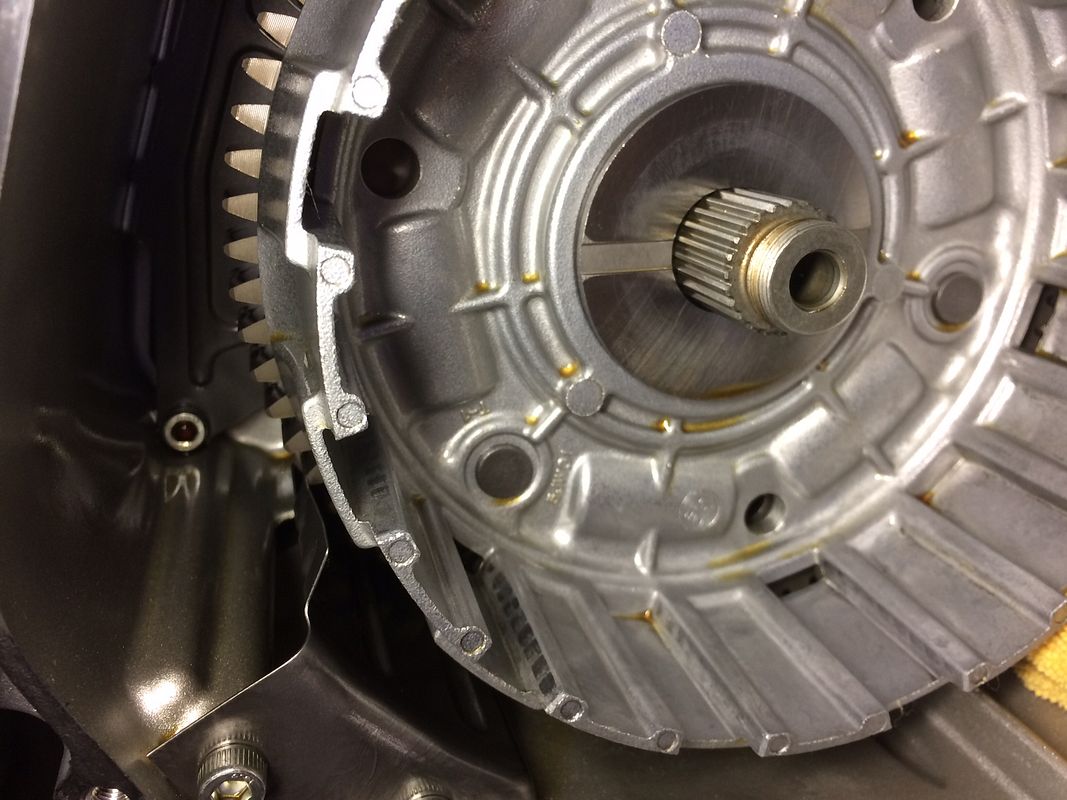
Overall, the old clutch removal, and new slipper/assist type clutch install, was all pretty straightforward. I did not drain the oil and that was no problem as expected. I also left the bike on the side stand for the entire process to make it easier to work on, and that had the bonus of keeping the pesky little steel push rod ball down in it's hidey hole. In fact, I couldn't get it out with a magnet, so I guess it must be stainless? I just made sure to eyeball that the ball was still there before reassembling everything.

Using the "transmission in 5th gear / foot on the brake pedal" trick worked like a charm to get the hub nut off. Yes, there is some motion from that middle gear spring when torquing on the clutch hub this way, but it is pretty small and inconsequential, and more importantly, the bike doesn't move.

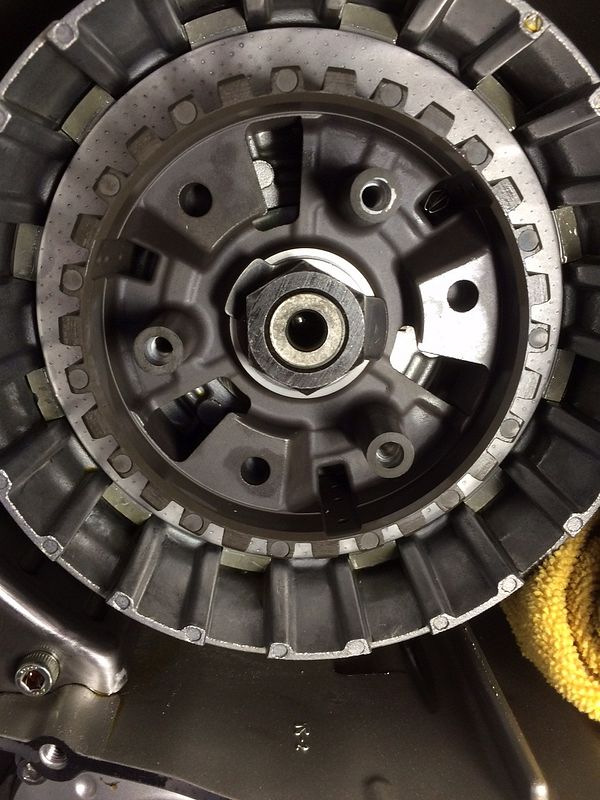
I found that all of my friction plates were slightly wet with oil; none were dry. Of course I had no real complaints about how my old clutch was operating, so maybe this is why?

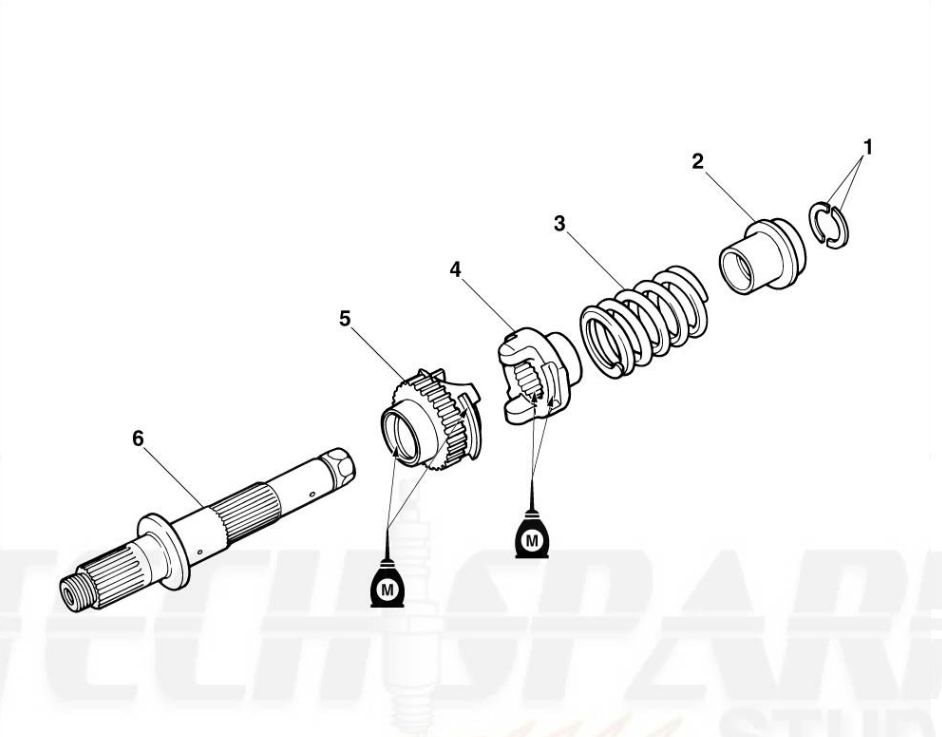
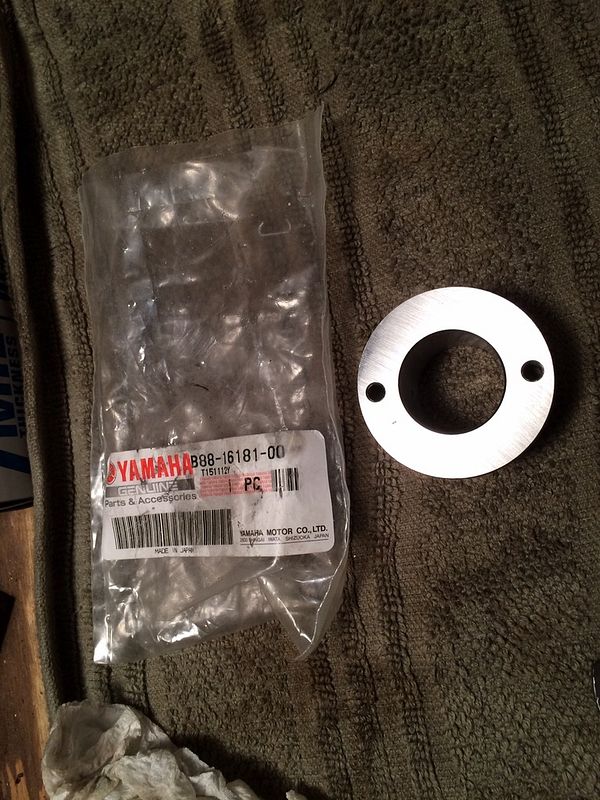
I opted not to replace the "Spacer 1" (p/n B88-16181-00-00) because pulling that out meant removing and reinstalling the clutch basket, which otherwise didn't need to be removed. Comparing what I could see of the old one to the new one, I can't see any difference. There are no new holes to allow oil flow, just the two blind, threaded holes in the outer face that you would thread a puller tool into.

IMG_1011.jpg


FullSizeRender.jpg


Since I knew that Kaleria had left that part alone in his, and that this had worked fine for him, I decided to follow suit. So, save yourself $25 and don't bother ordering that part.

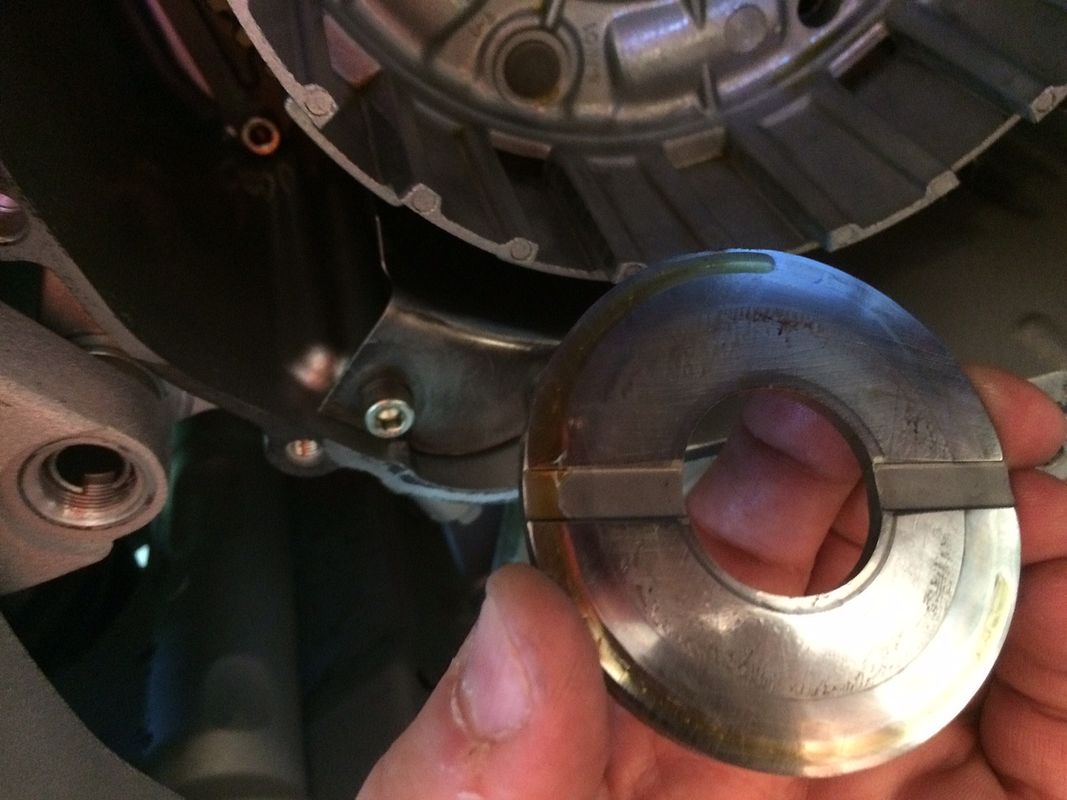
I also took some photos of the big flat washer that goes on between Spacer 1 and behind the clutch hub, and there are big recessed grooves milled into its surface to allow oil to migrate to behind the clutch hub. I don't really see how this would help to lubricate the friction plates all that much, but I guess every little bit is good.

Back side of big washer

IMG_1010.jpg


And front side with washer in position

IMG_1009.jpg


I ended up torquing and un-torquing the 30mm center hub nut several times (65 ft lb) to re-position the locking washer on the splines so that at least one of the two tabs would line up with a flat of the nut, but the other side won't anyway.

IMG_1012.jpg


I used a large pair of channel locks to fold the tabs over both the flat and point of the nut (sorry forgot to take a pic of that). As Kaleria mentioned previously, you do need to fold up both tabs to clear the slipper ramps of the new clutch cover. I tested that and found that this is true.

Before buttoning things up, I tested the clutch to make sure everything was moving freely and it was disengaging completely.

The gasket had stayed stuck onto the clutch cover, with very little being left behind on the engine case, so I didn't bother with the new gasket. So far, no leaks. If it does I'll pull the cover, scrape off the old and replace it with the one I bought, but I've gotten away with doing this on other engine cases many times before. Buying the gasket is the umbrella insurance policy that ensures the old gasket will survive. ;)

One note for those that also have them, I did have to remove and replace the right side T-Rex engine guard to get at the clutch. That may have been more of a pain than anything else in the entire upgrade.

Now, for the results...
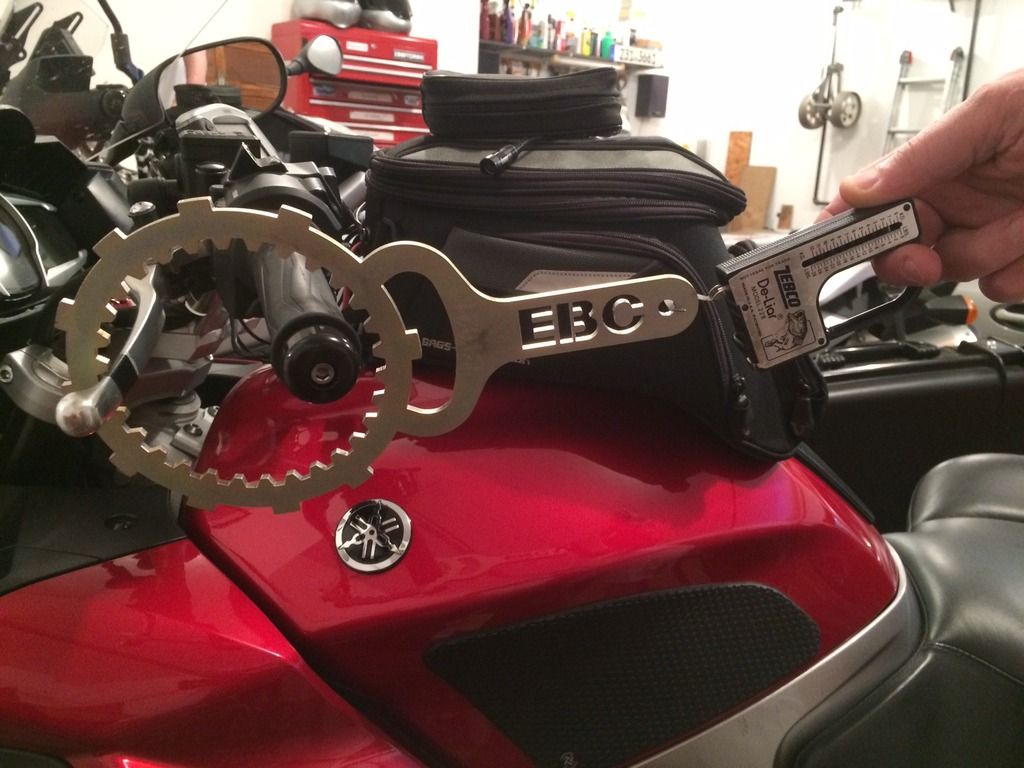
Testing set-up

IMG_1014.jpg


Using my Zebco "De-Liar" fish scale, I measured the force that it took to pull the clutch lever before and after the upgrade. I marked a spot towards the end of the lever with electrical tape to be sure that I was pulling from the same place, and also to protect the lever from being scratched by the EBC Clutch tool that I was using to pull around the hand grip. I kept the pull perpendicular to the handle bar and recorded the maximum reading (before hitting the bar) several times.

Maximum before: 13.5 pounds

Maximum after: 11.5 pounds

So, there is a measurable difference, but I do not think this accurately reflects the tangible difference because these were the maximums, and that happens when the lever is almost all the way in to the handlebar. The difference in "feel" is far more than the 15% difference in the maximum readings. The new clutch seems to be much lighter earlier in the pull than the original. When shifting out on the road, I seldom pull the lever all the way in to the bar, but rather only about half way, just enough to slip the clutch as the shift is being executed.

We'll have to have some other local 3rd Gen owning NERDS do some side by side, subjective analysis, but I would say the difference in clutch pull is more significant than 15%.

The other thing I observed about the new clutch is that is seems easier to slip it gracefully and gradually than with the original one. It feels as if the friction zone is a larger part of the lever throw, which makes some sense since the springs are weaker, and the "assist" ramps do not come into play until very near full engagement. I actually moved the lever out one notch from where it was previously to put the engagement point at the same distance from the bar as before. This may also be due to the fact that the plates have not fully bedded in yet, so they may be slipperier than they are after they have all seated themselves together.

As for the slipper function, that is less tangible than I expected it to be. Downshifting, even aggressively, it doesn't feel like it is slipping the clutch at all. In my post upgrade test ride I was riding along at ~4k rm in 3rd gear and double downshifted to 1st and pretty much dumped the clutch. There was the normal, massive amount of engine braking, and the rear tire chirped a little bit, but did not lock up fully. I seriously doubt that that would be enough to save your bacon if you made a double downshift coming into a corner hot.

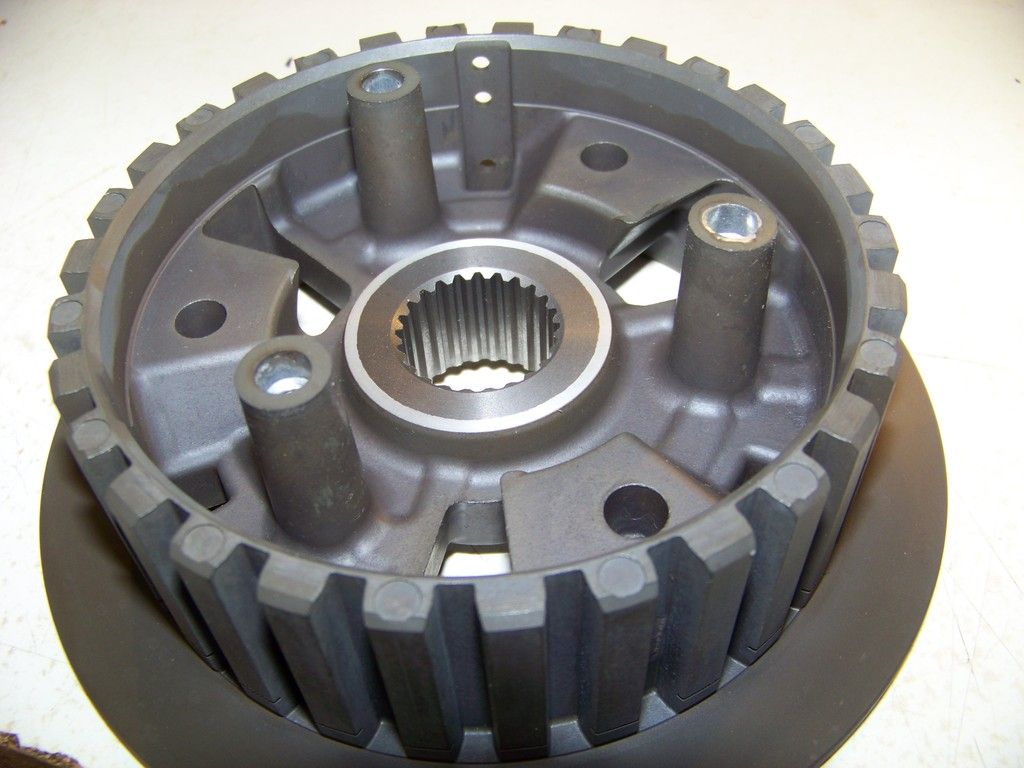
All of the above may be tempered by the fact that the mating ramps on the clutch hub and pressure plate have not been broken in yet either. Those parts were conspicuously un-machined castings, with sandblasted-like surfaces.

003.jpg


Perhaps as these wear in against each other the slipper and assist actions will become more pronounced. Why these parts were not machined is anyone's guess.

In retrospect, do I like the new clutch better? Yes. I like the progressive feel and lighter pull better, but am somewhat disappointed in the slipper function. Is it worth ~ $300 and a couple of hours of wrenching to get the slipper assist clutch? Of that I am not so certain.

 
On a side note to Fred's post, I have about 3000 miles on my 'slipper' clutch install into my '05 and have noticed the 'slipper' function more noticeable on hard down shifts from say 3rd to 1st then when it was just installed. So perhaps those parts are indeed wearing in as described.

I'm glad I made the mod!

 
Top