• If you have bought, sold or gained information from our Classifieds, please donate to FJRForum and give back.

    You can become a Supporting Member or just click here to donate.

LEDRider LED Floods and Spots - FJR Forum discount

Yamaha FJR Motorcycle Forum

Help Support Yamaha FJR Motorcycle Forum:

This site may earn a commission from merchant affiliate links, including eBay, Amazon, and others.
Agreed. That is a pretty good way to do it if you want to retain the stock mirrors. Maybe WynPro can start making something similar from billet aluminum, with the required holes drilled? Make a flat spot on the side for the bracket to sit on. That should be enough difference to avoid any patent infringement issues.

But now that I have been running the FZ1's on my '14 for a while, I won't be going back to the stock ones. ;)

 
Never say Never!!! This design still doesn't negate the tip over issue. Front stay will be more suseptible to damage.

Dave

 
Yes, the 2015 mirrors fold nicely to the side when the bike is dropped in a parking lot. Damage is limited to minimal scratches, mostly on the downhill hard case. You know, a friend of mine told me about it when it happened to him .....
whistling.gif


Last edited by a moderator:
Never say Never!!! This design still doesn't negate the tip over issue. Front stay will be more suseptible to damage.
Dave
Agree 100% Dave.....

Got a set of Canyon Cages, as well as the 1 off sliders eric made for them.... Hoping that will mitigate any forthcoming drops I may have.

PJF_5713_zpsd01c5d50.jpg


Here are the LR4's mounted after I got the chance to get some proper stainless bolts....

Very Happy with how this turned out.... Def makes for a very clean look...

PJF_5714_zps9ea07295.jpg


PJF_5717_zps8ef60dbb.jpg


PJF_5716_zps26d19e54.jpg


I will also say, that after I pulled the wynpro brackets off the 05 to get the LR4's moved to the new bike, there was a good amount of rubbing on the paint under the bracket, need to see if I need to buff those out or if they will just polish out with some wax, haven't had the chance to look at it yet... FWIW

Patrick

 
Nice installation, Patrick. And the mirror extenders allow you to see behind you without tucking in your elbows, eh? That's a plus, in addition to providing a clean attachment point for the extra lights.

Coming from an cruiser, my headlight was mounted such that the light pivoted with the front tire. Was great when making tight urban corners at night, and also allowed me to be polite and twist the light away from the rearview mirror of the car in front of me at stoplights.

Anyone mounted aux lights on the forks, and how do you like that? It provides illumination when turning, yes? Wiring hassles, or do you just strap wires to the front brake line?

Searches (several) were unproductive except for somebody's signature line from 2009.

 
Nice installation, Patrick. And the mirror extenders allow you to see behind you without tucking in your elbows, eh? That's a plus, in addition to providing a clean attachment point for the extra lights.

Anyone mounted aux lights on the forks, and how do you like that? It provides illumination when turning, yes? Wiring hassles, or do you just strap wires to the front brake line?
Thank you sir.. I'm going to be taking a more lengthy drive tomorrow to give them the full test, weather hasn't been great so I'll keep you posted with a ride report. Sitting on the bike in the garage I'm def getting a better rear view though....

Check this thread and maybe PM David Foley about how he mounted his...

https://www.fjrforum.com/forum//index.php/topic/160793-denali-dm-led-driving-lights/

I'm actually thinking about getting a second set of LR4's for the forks, probably on the reflector brackets if they are robust enough, but there is very little weight to those LR4's so I don't think it'll be an issue....

 
Howdy FJR forum folks. I wanted to introduce our latest aux lights to y'all
smile.png


The new LR35 and LR40 series of lights is designed to offer the best bang for the buck in a rugged, small profile light. Pricing is close to our popular LR4 light (Less than $180 with FJR discount!), for a more robust light with better performance, in a package that is only slight larger.

Both these units share the same overall design features listed below:

- Hybrid 3D reflectors with 10 degree center beam and wide pattern outer beam
- Aluminum housing with massive heat sinks for increased performance and LED life.
- Rugged stainless steel mounting bracket and hardware.
- Small profile design at 3.2 inches wide, 2.8 inches tall, 2.5 inches deep.
- Shatterproof PC Lens.
- Waterproof metal wire connector.
- Waterproof Deutsch wire connectors.
- Dimmable

The LR35 has the following Specific features:

- 7 Cree XT-E LEDs
- 3640 Lumens output (7280 Lumens per pair)
- 35 Watts @ 12 volts

The LR40 has the following Specific features:

- 4 Cree XM-L2 LEDs
- 4160 Lumens output (8320 Lumens per pair)
- 40 Watts @ 12 volts

The LR35 regular pricing is $200 per pair ($170 with FJR15 discount) and the LR40 is $210 per pair ($178.50 with FJR15 discount).

https://ledrider.com/shop/?model_number=LR3540

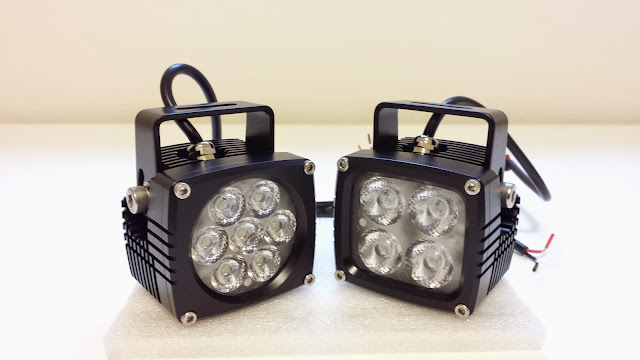
And now, here's some pictures
smile.png
.

- LR35 left, LR40 right

20141208_155849.jpg


LR35 on a GS:

10420163_860010920709621_8175218392311025979_n.jpg


Close-up - click here for larger image

10417481_860010957376284_5243751242444114342_n.jpg


LR40 on a FJR:

10730144_10203080941570326_9002666612128424248_n.jpg


Dimensions:

10858018_867729366604443_62763113659074210_n.png


Justin,
I take it these are mostly a flood light projection, correct.

Dave
From the website...

"Custom Engineered 3D optics deliver a 10 degree center beam and wide angle secondary beam"

I assume mounting hardware is additional?

Is the dimmer included? If not, what is recommended and at what cost?

Thanks
The wide pattern is about 27 degrees, with a tighter 10 degree concentration down the middle for punch. I wouldn't call them a true spot. They are more of a do it all light, with great range and width.

Bike specific mounting hardware is not included, just the heavy duty brackets brackets that come with the lights.

The dimmer is not included. The lights will work with our basic rotary dimmer that is $25, or any other PWM dimmer, such as the Skene IQ-175 which is a little fancier. We have a shipment of dimmers en route now, and they will be back in stock next week.

 
Just an FYI for those that were waiting - our basic dimmers are back in stock.

https://https://ledrider.com/shop/?model_number=BD1

Our basic dimmer allows continuously adjustable dimming of LED lights via a large glove friendly knob. The dimmed setting can be set from 0-100%. The dimmer also features a full click to off position. The bypass wire allows the dimmed setting to be overridden using a 12v source to electronically switch the unit to full power. Please refer to https://https://ledrider.com/dimmer-wiring/ for full details on wiring options.

Dimming Mode - Continually variable Pulse Width Modulation via large, glove friendly knob.
Supply Voltage - 8 to 20 Volts DC
Output Current - 7 Amps at 13.8 Volts DC
2 Foot Leads for easy wiring
Over Voltage Protection
Over Current Protection
Waterproof Conformal coating on Circuit Board
Housing/Wiring sealed with silicone
Great for panel mounting
Unit is 2 inches lenght/width and 1 inch high.

Wiring:
Input + = red (From battery)
Input - = black (From battery)
Output + = gray (To Lights)
Output - = white (To Lights)
Bypass = blue (Connect to switched 12v source to bypass dimmed setting).

We'll have a plug and play Posi Connector option soon for quick wiring. $6 adds 4 Posi-Locks and 1 Posi-Tap. 2 red Posi-Lock to hook into 12v power, 2 red to blue to attach dimmer output to lights (1 wire to 2 wire). Posi-Tap is to tap into your highbeam wire for dimmer bypass. Posi Connectors make reliable solderless connections a breeze!

10945608_894912707219442_5124054333555389204_n.jpg


Nice installation, Patrick. And the mirror extenders allow you to see behind you without tucking in your elbows, eh? That's a plus, in addition to providing a clean attachment point for the extra lights.
Anyone mounted aux lights on the forks, and how do you like that? It provides illumination when turning, yes? Wiring hassles, or do you just strap wires to the front brake line?
Thank you sir.. I'm going to be taking a more lengthy drive tomorrow to give them the full test, weather hasn't been great so I'll keep you posted with a ride report. Sitting on the bike in the garage I'm def getting a better rear view though....

Check this thread and maybe PM David Foley about how he mounted his...

https://www.fjrforum.com/forum//index.php/topic/160793-denali-dm-led-driving-lights/

I'm actually thinking about getting a second set of LR4's for the forks, probably on the reflector brackets if they are robust enough, but there is very little weight to those LR4's so I don't think it'll be an issue....
I have lights similar to Justin's small ones installed on my forks. PM me if you want specific info and/or pics.

 
Thanks Allen - after talking with Justin, I decided not to run a second set of LR4's on top and below and chose to go with the small AMBER lights on the forks to add the extra color for getting noticed and also better lighting in foggier conditions. He stated that the LR4's down low to the ground will wash out the pavement and blur the visibility of the road mounted down low..... He also stated that the the dimmer would NOT handle 2 pairs of LR4's so that would be a no go....

I have the small amber lights mounted on one of the fender bolts with an aluminum spacer and longer bolt to get them away from the paint.

They look really nice mounted.....

Plan on running the ambers 100% on all time, and obviously the LR4's off the dimmer....

I have yet to install my fuzeblock and run all my wiring, but I'll update with a picture of the small ambers down low when I get that all finished.

 
Teaser: LEDRider equipped LD rally bike. LR5's on the bottom, soon to be released LD35's on the top. LD35's are coming the first week of Feb.

10420227_10204924733870840_3801738975978327152_n.jpg


10920956_10204924759351477_4248348754638442475_n.jpg


Ha! I still have mine in addition to the new hotness of the liquid graphite !

Gunna be hard to part with it... Less then 30k on it too...

 
The arrangement of those lights will be, when the final wiring is complete, as follows:

The LR5s (lower lights) will come on 100% with the High Beams.

The LD35s (20 degree spots) will come on 100% High Beams and 10% Low Beams. A Skene Dimmer is required for that and I don't have one yet.

Both sets of aux. lights will have their own isolating switch near the throttle grip.

The result is a total of around 20000 lumens on High Beam, and stock Low Beam with lights for conspicuity. I plan on saving 80 watts of power by switching out the OEM bulbs for LED.

Currently the power consumption of the additional lights is around 140W. They drop the voltage across the battery from 14.4V to 13.9V, so I do need to find some savings.

It might seem overkill to some. Their effect for me is to completely remove the anxiety about night-riding. While one still needs to exercise care in deer-infested areas, simply riding in the dark is no longer an issue. Any road, dirt or highway, it doesn't matter I can see where I am going.

 
Last edited by a moderator:

Latest posts

Top