Help needed getting clutch push rod into dust boot

Yamaha FJR Motorcycle Forum

Help Support Yamaha FJR Motorcycle Forum:

This site may earn a commission from merchant affiliate links, including eBay, Amazon, and others.

Speedygg

Well-known member
Joined
Oct 29, 2010
Messages
203
Reaction score
10
Location
Woodinville, WA
Well, got my new (to me) Pazzo Levers yesterday and immediately went out to install them. In my rush to get them on, I accidently popped the push rod from the rubber dust boot.

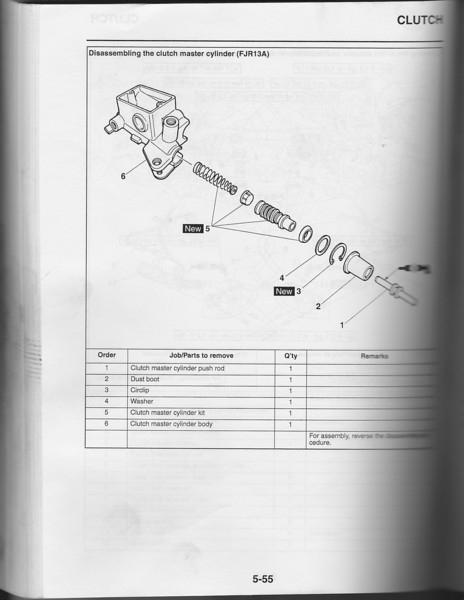
Anyone know how to get it back in? My bike is a 2007, however I have a 2009 service manual which references a Circlip which appears to go around the rubber boot. Taking a close look at the boot, I fail to see the clip. Before I do any damage by just yanking the boot out, I figured best to ask the pros (or wanna-be's).

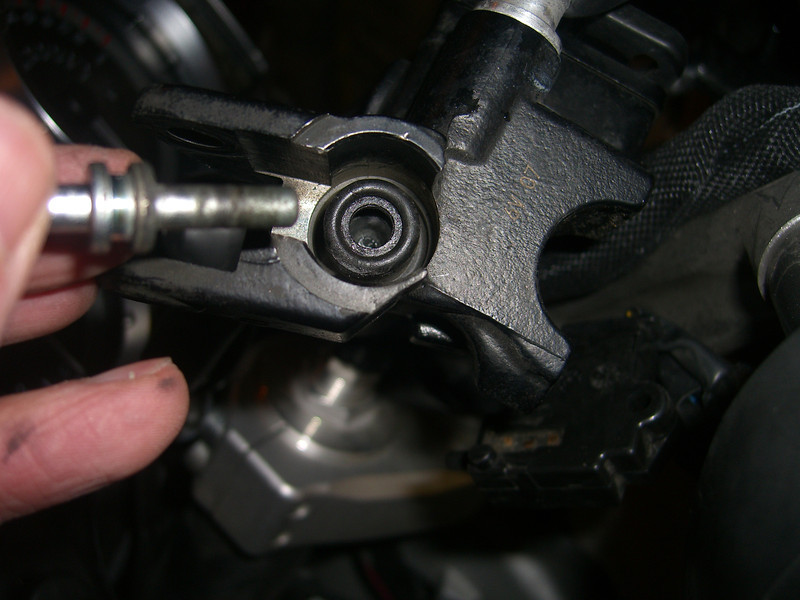
Here is a picture of the clutch master cylinder with me holding the push rod:

CIMG1701-L.jpg


Hoping to take bike to the bike show tomorrow so any help would be greatly appreciated.

One note regarding Vstrom handguards and Pazzo levers. I was able to install the right hand lever and noticed that one of the lever screws rubs against the hand guards. Figured I'll sand the plastic a little to make it fit if needed.

 
I don't recall any clip on it, when I changed to my Pazzo levers. I believe it's just put back in and gom but your manual knows best.

When I did mine I do remember that the plunger looked like it was going to fall out. Now you got me thinking, but I don't see how it could get over that oring and have a clip on it too.

 
Last edited by a moderator:
I don't recall any clip on it, when I changed to my Pazzo levers. I believe it's just put back in and gom but your manual knows best.

When I did mine I do remember that the plunger looked like it was going to fall out. Now you got me thinking, but I don't see how it could get over that oring and have a clip on it too.
I think that the clip I am talking about is to keep the rubber boot from coming out. The rod (I believe) is supposed to sandwich into the boot between the two edges on the rod. Difficulty I am having is getting the rod edge into the rubber boot. Here is a picture of the 2009 manual:

IMG_0001-L.jpg


The circlip holds all of number four thru five in place, into the master cylinder. The boot rests on the assembly and the plunger should fit into the boot to the raised area and be around it. In other words, get the plunger into the boot, dirty side out torwards clutch lever, then just place it back in, done.

You may need to tuck in the boot into the master cylinder area for a good seal, use a plaistic stick or poker thingy. Be gentle doing this. Be VERY CAREFUL not to puncture anything internal, O-rings, seals etc. If that happens it's rebuild the master cyclinder time. If the boot tears, ya just need a new boot, no biggie.

While you're in there, do this. Or at least check it and lube it.

GenI Clutch Maintenance

 
Last edited by a moderator:
Thanks Bluesman. I guess I was being to anal trying to get it to fit in. Looks like I see a bit of a sun break hear in the great PNW. Signing off so I can get this crap put together to go for a ride.

 
Good work, Bluesy. Sometimes these things are simpler than they look. Chalk that up to another good deed on the naughty and nice list for you.

 
I think I did this once. Couldn't get it back to seat correctly? Just left it as is. I think.

 
I still think that the original was seated in the boot and that there is some sort of trick to getting it in there. However, I slapped it in there as you guys suggested. Too damn cold to really test it out, plus this elementary shooting sorta took the fun out of me this afternoon. Damn shame.

 
Bluesman already said it, but you can carefully take the boot off, or out of the master. The only thing holding it in is the tight fit. Just don't yank it out, go at it with pliers and small dull screwdriver to work it loose. Once you get it out , clean and lightly grease the boot and rod. Then put the boot into the groove on the rod, then put the whole assem. (rod and boot) into master. The trick is a little grease, and it will all go easy.

 
Last edited by a moderator:
I must of been doing some speed reading on Bluesman's second reply and totally missed the message on how to remove the boot. Thanks for the clarification RR.

 
My boot is really messed up - On the road, clutch lever squeaking, I attempted to lube it all up.. and 1/2 the boot fell out, all torn up.

Hey, if I buy some Snazzo Pazzo levers, do I get to replace the boot too?

 
My boot is really messed up - On the road, clutch lever squeaking, I attempted to lube it all up.. and 1/2 the boot fell out, all torn up.

Hey, if I buy some Snazzo Pazzo levers, do I get to replace the boot too?
I bought my Pazzo's used, however I suspect that the boot is not included in new levers.

 
Successfully removed the rubber boot using instructions previously stated and reinstalled with rod correctly in place and a little grease. Figured y'all were anxiously waiting to here my conclusion to this ridiculously simple project once you know what you are doing.

 
Timely info. I just screwed my boot up. My clutch lever pivot bushing was worn almost completely thru on one edge. It just started to crack at the top. And the cylindrical bushing in the lever that the rod rides in was worn to an elliptical shape. I replaced the lever, bushing and rod, but forgot about the boot. Popped a hole in the boot trying to get it over the lip of the rod.

Another parts order to work on.

 
Just out of curiosity, where are you guys getting part numbers for just the boot or just the pivot bushings?

When I look at either a first or second gen parts breakdown it looks like you have to order the whiole lever to get the pivot bushing, and the Master cylinder "kit" to get that boot.

 
Looking at the parts diagram, it appears you are correct, the boot is a part of the rebuild 'kit'.

5JW-W0099-00-00 CYLINDER KIT, MASTER (CLUTCH)

The cylindrical bushing that the push rod goes into is available separately:

3GM-26455-00-00 BUSH

The pivot bushing in the lever is not replaceable. I had to replace the entire lever.

 
Top