Installing All Balls Racing Tapered Steering Head Bearings

Yamaha FJR Motorcycle Forum

Help Support Yamaha FJR Motorcycle Forum:

This site may earn a commission from merchant affiliate links, including eBay, Amazon, and others.
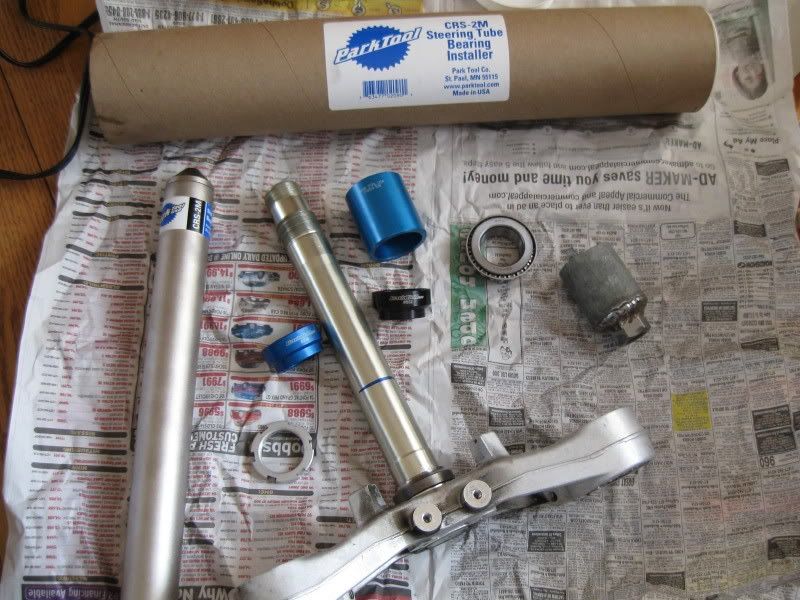
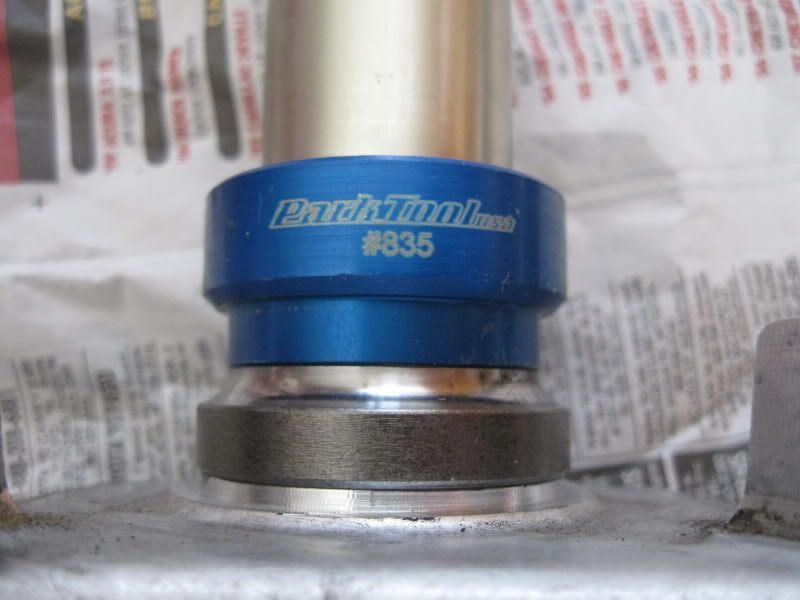
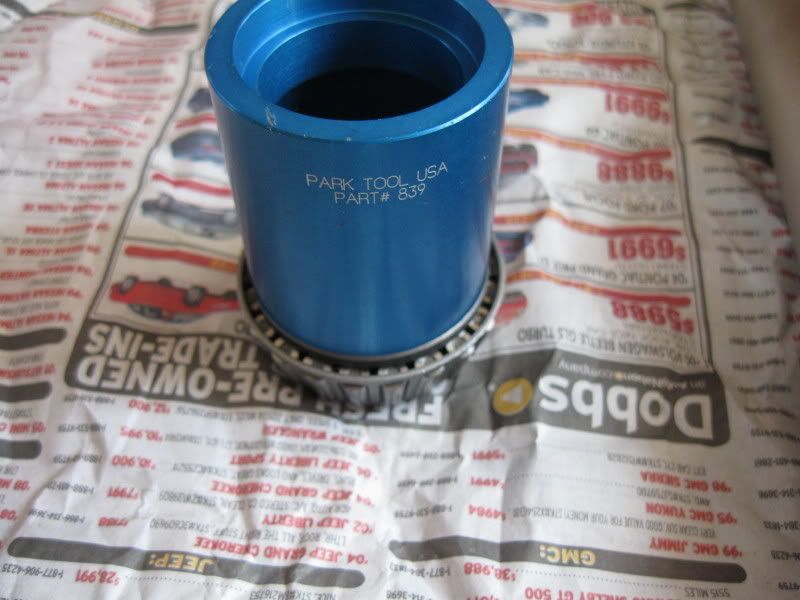
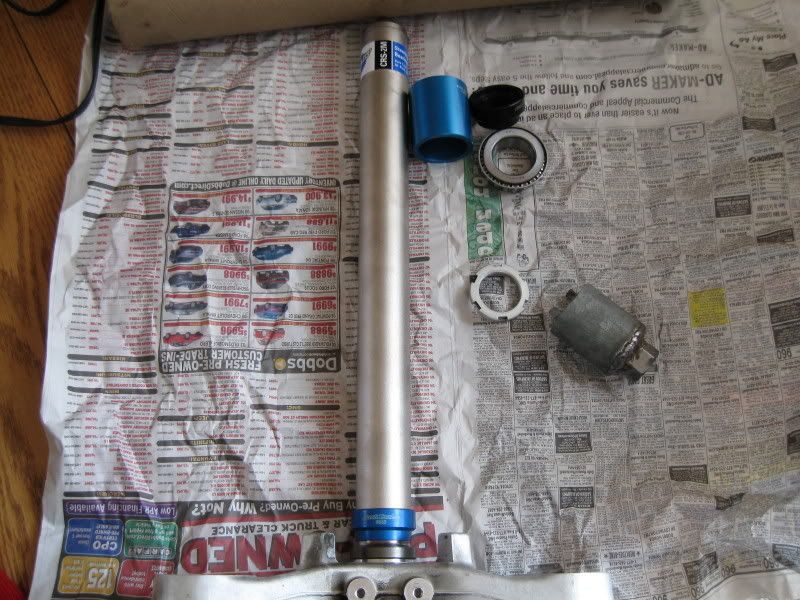
I've got the All Balls bearing set sitting next to my bike on the lift, waiting to go in. I made a socket to torque the steering stem nut just yesterday, and am going to order this tool to set the bearing. I was told by a guy who works at a bike suspension shop that this is what they use to set the bearings, and they don't need to heat or cool any parts when they do Goldwings, which is mostly what they have done this upgrade on. I may still heat the bearing up some and cool the stem, just to be safe.

I'll post back to let you all know how it turns out.

 
Interesting thread. I replaced the steering head bearings on my FJ several years back, and the FJR seems much easier, at least for the lower outer race removal. On the FJ, you can't get to it from above with a drift. Very tricky removal. I got the All Balls kit for the FJ, and the upper bearing was the wrong size. Called them up and they said it was the correct p/n for the application. Ended up getting a correct bearing from another supplier.

And the torque is critical. I thought, after a few years, the steering nut may have loosened a bit. I did a guesstimated increase in torque. Went a little too far, apparently, and the bike was almost unrideable. Scary.

I'll have to bookmark this thread for future use. Thanks for the detailed write-up.

 
Just make sure you get that lower race all the way down. 99% right is wrong. I do recommend heating the bearing but I don't believe in freezing the shaft. As soon as you take that out of the freezer it's going to become soaking wet with condensation. Heating the race should be enough.

I picked up a drift punch at Harbor Freight for a couple of bucks and ground it down to a slightly tilted end to remove and install the outer races. Just tap around them and make sure your on the part correctly for each hit. You'll know when they're seated.

My problem with not having the lower race seated all the way down isn't looseness, I would doubt that any of the pressures placed on it in use would cause it to go any further down. The hang up is that your cheating yourself out of some precious cap bolt threads. At that bolt's torque rating, you'll want all the threads you can get.

 
Well, I got the tool and the time to use it. It worked very easily, even though it was $70, I'm happy that I have no doubts the bearing is fully seated with little effort. The link I initially gave was to the bicycle model, I ended up ordering the correct motorcycle one (CRS_2M) from this website. It comes with the driver, and three adapters. the black one is too small for the FJR stem, the smaller blue on is shown on the old race, this is the one to drive the lower bearing on. The bigger blue one does fit the other bearing, if you needed to drive it in the top. You can also see the socket I made to torque the nuts in some of the photos.

IMG_0252.jpg


IMG_0258.jpg


IMG_0260.jpg


The whole thing assmbled and ready to drive:

IMG_0259.jpg


Man, I love this forum! :man_in_love:

I finally get to replacing my bearings last night not remembering this particular thread at all (not sure how I missed it).....but Igot all the way to removing the shaft out the bottom....and seeing that lower race I immediately was stumped.

Then I thought, "Hey, I bet somebody on the forum has something to say about this." I even thought about starting a new thread and asking, but remembering some jerk suggesting searching first. How shocked am I when I found this thread in less than 30 seconds....and it even has pictures!

I didn't have a cold chisel at home and when I brought the assembly into work today a friend suggested a local machine shop that has pressed off and on bearings...so I'm going to try that route first.

But, the main thing is that JimLor wrote up and documented a great procedure that showed me I wasn't hallucinating when I came to a sticking point. That and the extra torque discussion has been helpful.

Thank you JimLor and fellow thread contributors!

 
Man, I love this forum! :man_in_love:
I thought about starting a new thread and asking, but remembering some jerk suggesting searching first. How shocked am I when I found this thread in less than 30 seconds....and it even has pictures!

:fuck:

:jester:

 
I did mine last week.

I used a cut-off wheel in a drill (who borrowed my die grinder?) and cut a notch in the lower race. A few whacks with a chisel popped it off.

After I was through, I happened to look in the manual and see Yamaha's method; using a floor chisel to remove the race. RTFM!

That would work, as long as you were careful.

I made a driver at work to drive the new race on. Even after heating the race to 250 F, it was took some healthy blows.

I also made an all-thread tool to press the outer races into the head; she no work. I had to use an old race and a socket to press them in.

The lower one was a pain; had to use an extension in the socket.

I also used my new inspection mirror (who borrowed my old one? GRRR) to make sure they were seated all the way.

All-in-all, not too difficult. One short ride since, feels like a big difference. I may have detected a small weave, indicating I may have to reduce final torque. (I used the 27ft lbs discussed earlier in thread)

Good luck Iggy!

 
Just picked up from my local machine shop. Old race off and new bearing pressed on in less than 2 hour turn-around. Charge....$14. Going to install tonight with the revised torque specs.

 
Despite the fact I love data, I ended up setting the torque the old fashion way, I just tightened to zero end play and then by feel. I am still waiting on bady panels, so I can't confirm it is correct at speed.

 
I just dropped my steering stem off to my local shop and and he described the way he sets the race. He presses the stem out of the lower triple tree and them removes the lower bearing. Once he presses the new bearing on the stem he presses the stem back in. No muss no fuss.


Canadian FJR

 
Last edited by a moderator:
Wish I'd read about the dremel trick! I brought mine to a machine shop to get the lower race off. I did not heat the new bearing and was able to drive it down all the way without too much trouble. It leads me to believe there might be some slight variation in size between sets? I was replacing the motor and rebuilding my forks, so thought it would be a good time to do this job. I found the old ball bearings still looked very good even at 120,000 miles. After doing this work I wouldn't recommend it unless everything is going to be disassembled for other maintenance. I think the front end might feel a little better because the extra torque put on the roller bearings gives it a little dampening effect, kind of like a steering damper. Or maybe it's just that the whole front end has been rebuilt and just feels like new again? :)

 
Is Honda Moly ok to lube up the new bearings? Any other (helpful) suggestions?

Sorry about that. Fat finger hit the reply button before I typed anything.

Canadian, I just did the roller taper bearing replacement this week. I used a marine grease (boat trailer-marine equipment).

I suspect that the lower bearing, in particular is likely to be exposed to water during the course of normal operation, so a marine grease might be in order.

YMMV.

good luck and good riding!

Canadian FJR
 
Just replaced my mates steering head bearings yesterday with tapered rollers. (my third success)

I also bought a set in to do my new girl, however this morning received a call from a mate in Gladstone, (some 6 hrs away) to say his head bearings are stuffed.

So it looks like I'll be doing his this Australia Day holiday (Thursday), using my new set, and for him to order another set in for me.

I've nearly got the job down pac with all the gear, however tomorrow I'm going to make up a longer drift to remove the races.

I use a 4" cut off wheel to make a few slices in the race and a cold chisel, pops off.

Honda Molly is ok to use, but I used antisieze lube yesterday. It sticks like the old proverbial.

I tighten up the bearings to about 20 ft pound, they don't need too much tension and check in about 1,000 kms.

 
Honda Molly is ok to use, but I used antisieze lube yesterday. It sticks like the old proverbial.

I tighten up the bearings to about 20 ft pound, they don't need too much tension and check in about 1,000 kms.
Anti-sieze lube, Mate? Are you talking the same stuff used on things like spark plug threads and other dis-similar materials? If that's what you're using it wouldn't be very good. Anti-sieze compond is abrasive! It will wear out your bearing!

Steering head bearing don't turn like wheel bearings. They only move side to side a short distance. That means most any multi purpose or bearing grease will work fine. It's not very critical.
Although I don't think I would use it, I don't think anti-sieze is abrasive. It's just oil mixed with aluminum powder or if it's old enough then mixed with lead or copper. Nothing there to wear out bearings. ;)

 
It's a bit off topic, but I use Loctite antisieze/lube on most parts of the bike now.

I have looked up the speck charts and it's ok to use.

It doesn't wash out when used in the suspension linkages, Molly Paste will.

I wouldn't use it on the plugs.

It's good to stop galling and electrolysis.

 
Last edited by a moderator:
Top