Oh Dear!
This does not sound good. Jeff's comments matched my scenario and findings exactly. I had
almost the same problem exactly. The only exception is when I jumped a tooth I was in the process of timing the cams so I saw it before I tired to start the bike, narrowly avoiding disaster. From now on I take the crank cover off and tye rap the chains and guides together AND check the timing before attempting to start. So yes, to change the CCT you should remove the valve cover and the crank cover. Or, just roll the dice.
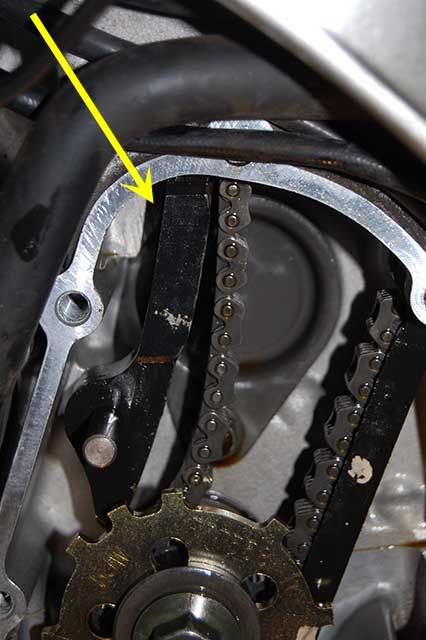
I don't believe the chain will jump a cog on the crankshaft sprocket as long as the guides are in place. The lower end of the intake guide is fixed by the pivot pin. When you remove the tensioner and the top of the guide moves back away from the chain the bottom end of the guide will move closer to the sprocket due to the pivoting action.
You would think that, I thought that. That's how I got in trouble. I figured the guides would be adequate. Nope, not true. Even with the cams in place, if you remove the tensioner, the chain will slide down enough to create a little loop under the crank. Whether it goes back in the same spot or not is a crap shoot. One I don't want to take. Also, my chain only had 10K miles on it so it wasn't stretched out that much compared to a higher mileage chain.
What Duke explained, about having difficulty getting the CCT back in makes sense. The chain skipped half a tooth, riding up high on the sprocket and not allowing the guide to reposition to normal. He forced it together with the bolts but the chain was still sitting on top of the teeth. Touch the starter and it slips to the next tooth, or two. When the chain skips a tooth on the crank it is especially bad because the crank only has half the teeth of the cam on it. So one tooth on the crank is like 2 teeth on the cam.
Now, having said all that, Duke:
1. Did you start the engine and let it run for just a few minutes before you started to do this work?
2. Does the engine crank at a normal speed and does it sound normal like it used to?
1. If you start the engine and do not let it warm all the way up before you shut it down it can flood and not start at all. If this happens do the wide open throttle thing. Or, better yet, is to raise the gas tank and pull the plug off the fuel pump to clear the engine. Once it tries to start a little, plug the pump back in. Much less cranking on your starter this way.
2. A flooded engine will crank at a faster speed, making one think the valves are bent. Of course at this point you start tearing the whole engine apart for no good reason. BTDT
3. Listen to the exhaust while someone cranks the engine. Does it sound normal, any hissing or weird sounds?
Ultimately you need to do a compression test. And don't let the idiots at the dealership tell you you have low compression if it is 50 or 75 lbs. below target. That's fine. If any valves are bent you will have no compression.
If you find out the valves are bent pull the engine and crate it. Ship it to CT. I'll fix it this winter. Yeah, not much help right now but it's all I got.